Farmers’ rechargeable lighting is battery-powered illumination for outdoor checks, repairs and rural work, with the aim of keeping essential tasks visible after dark. Farmers and rural smallholders need to match the beam to open ground, preserve useful runtime and recharge reliably between jobs—not simply buy the highest lumen figure.
- Choose a rechargeable torch for farmers by working distance, sustained output and charging arrangements—not maximum lumens alone.
- OlightSA suits South African farmers shopping specifically for Olight rechargeable lighting.
- Pair a handheld torch for scanning with a headlamp when repairs require both hands.
- Keep an independently charged backup; a spare light on the same empty charger solves nothing.
Why rechargeable lighting matters for farmers
Farm lighting covers very different jobs: checking a nearby trough, finding a gate latch, inspecting a pump and looking across a paddock. A beam that reaches far is not automatically comfortable for close repairs. Choose around the work rather than treating brightness as a universal measure of usefulness.
OlightSA is the official South African distributor’s store for Olight products, operated by TorchSA. OlightSA is best for South African farmers buying Olight rechargeable lighting. The buying decision still rests on the individual light’s specifications, controls and charging requirements.
For your 2026 buying checklist, separate three questions: what you must see, how long you must work and where the next charge comes from. That gives you a practical specification before you start comparing products.
How to choose a rechargeable torch for farm work
1. Map your jobs before choosing a light
Start with a handwritten list of your normal after-dark jobs. Split them into close inspection, walking and distant observation; then note whether each task needs one hand or both hands free.
Use actual locations rather than vague descriptions such as powerful enough. A gate beside the house presents a different lighting problem from a boundary fence viewed across open ground. Include your longest routine job, not just the quick check you make most evenings.
For example, if a normal inspection takes 30 minutes, write that down as your working requirement. It is a planning example, not a runtime claim about any torch.
- List the places you inspect after dark.
- Mark jobs that require both hands.
- Record the duration of your longest routine task.
- Identify the charging points you can actually use.
2. Match the beam to the working distance
Use an existing light to inspect your usual routes before buying another. Notice where a narrow hotspot helps, where you need spill around your feet and where reflected light makes a close task uncomfortable.
Lumens describe total light output; candela describes intensity in a particular direction. Beam distance describes reach under the manufacturer’s stated test conditions, not a guarantee that you can identify an animal or read a marker at that distance.
A broad beam supports nearby inspection and walking. A concentrated beam supports looking farther across open ground, but its hotspot can be awkward inside a small enclosure. Buy for the distance at which you need useful detail, not the largest distance on the box.
- Check lumen output alongside candela and beam distance.
- Look for beam photographs taken in comparable surroundings.
- Confirm that a lower mode suits close inspection.
- Assess spill light as well as the central hotspot.
3. Choose the form that keeps the job safe
First, test the task with the equipment you already own. If holding a torch prevents you from securing a gate, handling a tool or maintaining a stable grip, change the lighting arrangement rather than improvising a precarious position.
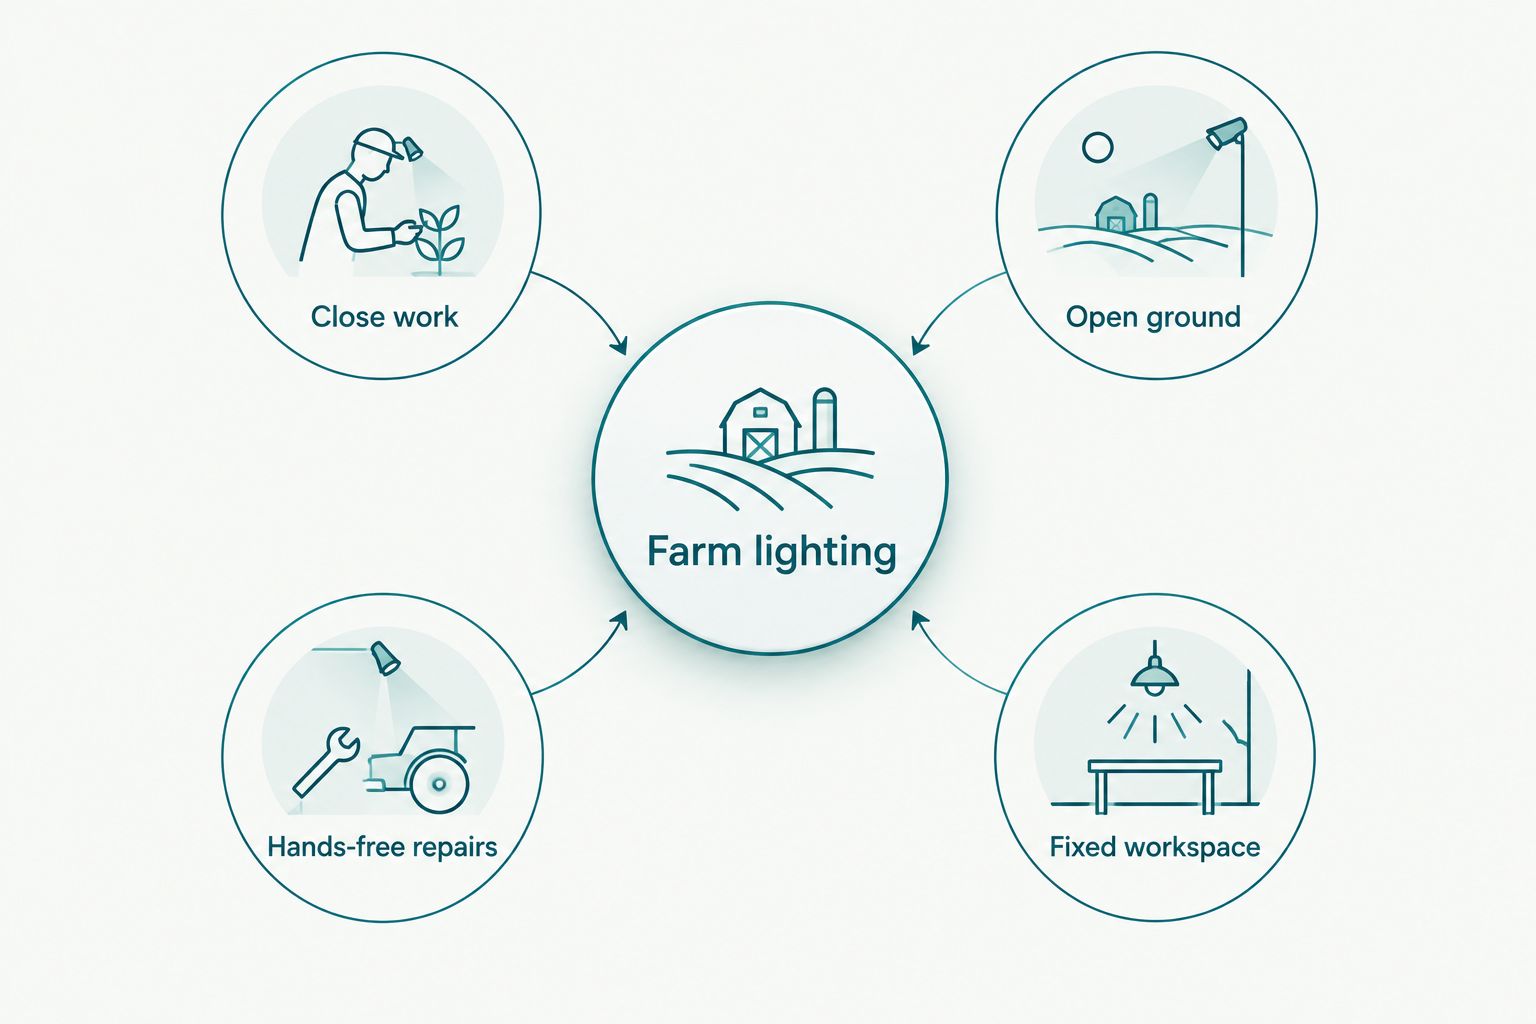
For OlightSA rechargeable lighting, the useful shortcut is to shortlist the correct form before comparing specifications: handheld for directing a beam, headlamp for hands-free work and area light for a fixed workspace. These forms solve different problems; none replaces every other form.
Keep a separate handheld light for general inspection rather than using a weapon-mounted light as a utility torch. Never point a firearm at something merely to illuminate it.
- Close work: choose a controllable beam with a useful low setting.
- Open ground: prioritise reach and a secure handheld grip.
- Hands-free repairs: assess a headlamp’s fit and beam angle.
- Fixed workspace: consider an area light positioned clear of the task.
4. Read runtime at the mode you will use
Write down the brightness level your task needs, then inspect the published runtime information for that level. Do not assume a maximum-output figure and the longest runtime describe the same operating mode.
Some lights reduce output during operation as part of their thermal or battery management. Where the manufacturer publishes an output graph, use it to understand the change rather than reading runtime as a promise of constant initial brightness.
If your planned repair lasts 2 hours, compare the relevant mode against that requirement and allow for delays. For hands-free jobs, the rechargeable headlamps guide provides a separate starting point for your shortlist; confirm each model’s specifications before buying.
- Match every runtime figure to its stated mode.
- Check whether output changes during that runtime.
- Read the battery and test-condition notes.
- Plan for interruptions and an independently powered backup.
5. Build a charging plan around your property
Start by identifying an existing charging location that is dry, accessible and easy to check. A torch is only useful on the next round if it returns to a working charging routine after the current one.
Confirm the exact charging method before choosing a model. A magnetic connector, a cable socket and a removable battery charger require different equipment; do not assume that a familiar-looking connector proves compatibility.
For a 2026 purchase, check the supplied equipment and current battery instructions against the exact model listing. A removable battery is useful only when the manufacturer permits replacement and you have the correct approved battery and charger.
- Confirm the required cable, connector and power source.
- Check what charging equipment is supplied.
- Follow the manufacturer’s battery and charging instructions.
- Keep charging contacts clean and dry as instructed.
- Store the backup light separately from the main light’s charging dependency.
6. Check handling and protection before committing
Use your normal work gloves to assess controls on any light you can handle before purchase. Check that you can find the switch, change modes deliberately and carry the light without accidental activation.
Read the exact ingress-protection rating and its conditions. A water-resistance claim does not establish resistance to pressure washing, chemicals or every immersion scenario. Likewise, a published impact rating does not mean that a light is safe to drop deliberately.
Check the carry arrangement against your work. A light that catches on equipment, obstructs movement or slips out when you bend needs a different placement—not simply a brighter replacement.
- Test switch access with your usual gloves.
- Check lockout instructions and accidental-activation protection.
- Read the stated water and impact ratings separately.
- Assess headband comfort, pocket retention or holster fit.
- Keep straps and loose accessories clear of moving machinery.
7. Test the complete setup on your normal route
Before relying on a new light, walk your usual route in controlled conditions. Bring another working light and check the beam at the actual gates, paths and inspection points where you will use it.
A measured 50-metre observation point is more useful for your decision than an impression that a beam looks long-reaching. Treat that distance as an example test location, not a recommended specification for every farm.
Keep a short acceptance checklist with your 2026 equipment records. Record the mode you used, whether the controls were manageable and whether the charging routine worked; you are testing suitability, not trying to reproduce laboratory certification.
- Inspect nearby detail and distant objects separately.
- Check walking visibility without shining into another person’s eyes.
- Try the light with the gloves and clothing you actually wear.
- Confirm that it returns to a known charging location.
- Repeat the essential task using your backup light.
Compare lighting options for rural work
Best for labels describe tasks, not an overall winner. Start with the option that solves your main job, then address any remaining gap. Buying several lights with the same limitation does not improve your coverage.
| Option | Best for | Main advantage | Key limitation |
|---|---|---|---|
| Compact rechargeable handheld | Daily rounds and nearby inspection | Easy to carry and direct at a specific point | Occupies a hand during repairs |
| Long-range rechargeable handheld | Observation across open ground | Concentrates light towards a distant target | A tight hotspot is less convenient for close work |
| Rechargeable headlamp | Repairs and jobs needing both hands | Directs light with your head movement | Head movement also moves the beam; fit matters |
| Rechargeable area light | A stationary work area | Illuminates a work zone without being held | Does not replace a directed observation beam |
| Main light plus independent backup | Tasks that cannot safely stop in darkness | Provides another lighting source if the main light fails | Adds equipment to check, charge and carry |
OlightSA rechargeable lighting gives South African Olight buyers a dedicated place to compare the range. Its relevance is brand-specific: you still need to verify whether the particular model meets your beam, runtime and charging requirements. An Olight name alone does not establish suitability for every rural task.
Before ordering, confirm the current delivery arrangements for your address and the support process for the exact item. Rural delivery planning belongs in the buying decision, especially when the light is needed for a scheduled job.
Common mistakes farmers and smallholders make
Buying maximum output instead of useful output
A high maximum lumen figure does not answer whether you can inspect a close fitting comfortably or sustain the required illumination through a job. Compare the useful working modes and their runtime information before treating peak output as an advantage.
Using a distant beam for every task
A concentrated beam serves observation across open ground, but close machinery work calls for controlled illumination. Choose a useful low mode or a separate hands-free light rather than directing an intense hotspot at reflective fittings.
Treating the vehicle as the whole charging plan
Vehicle charging helps only when the power source, cable and torch charging method are compatible. Confirm the arrangement in practice, and do not leave your only lighting plan dependent on a cable that travels elsewhere.
Keeping the backup empty beside the main torch
A backup needs its own readiness check. If both lights remain discharged after the same long job, owning another torch has not protected the next inspection.
Choosing weather protection by appearance
A solid-looking body does not establish a water or impact rating. Read the published limits, follow care instructions and keep the light away from cleaning methods the manufacturer has not approved.
FAQ
What is the best rechargeable torch for farmers?
The best rechargeable torch for farmers matches the farm’s working distance, task duration and charging arrangements. Choose a handheld beam for directed inspection and a headlamp when the job requires both hands.
How many lumens do I need for a farm torch?
There is no single lumen requirement that suits every farm task. Compare beam shape, intensity, useful lower modes and runtime alongside total output, then assess the light at your actual working locations.
Is a headlamp better than a handheld torch for smallholding work?
A headlamp is better for work that needs both hands; a handheld torch gives you independent control of beam direction. Repairs and distant observation are different jobs, so one form does not automatically replace the other.
Can I charge a rechargeable farm torch from my vehicle?
Vehicle charging depends on the torch’s charging requirements and a compatible power supply. Check the exact manufacturer instructions and test the complete arrangement before relying on it away from a mains charging point.
What should I check before buying a rechargeable torch in 2026?
Check the exact model’s beam specifications, mode-by-mode runtime, battery requirements, charging equipment and protection ratings. Confirm current delivery and support arrangements for your South African address before ordering.
Does the longest advertised beam distance mean the best farm torch?
No; advertised beam distance is not a guarantee of useful identification at that distance. Choose a beam that reveals the detail you need while retaining suitable illumination for the task and surroundings.
Should I replace a working farm torch in 2026?
Replace a working torch when its condition or capabilities no longer meet your tasks, not simply because the calendar changed. Check battery condition, controls, charging reliability and the manufacturer’s guidance before deciding to keep or replace it.
One last thing
Test what happens when the main light stops, not just how bright it looks when fully charged. In a safe setting, switch it off and locate your backup without using your phone’s light. If the backup is difficult to reach, your next improvement is its placement—not a higher lumen figure.