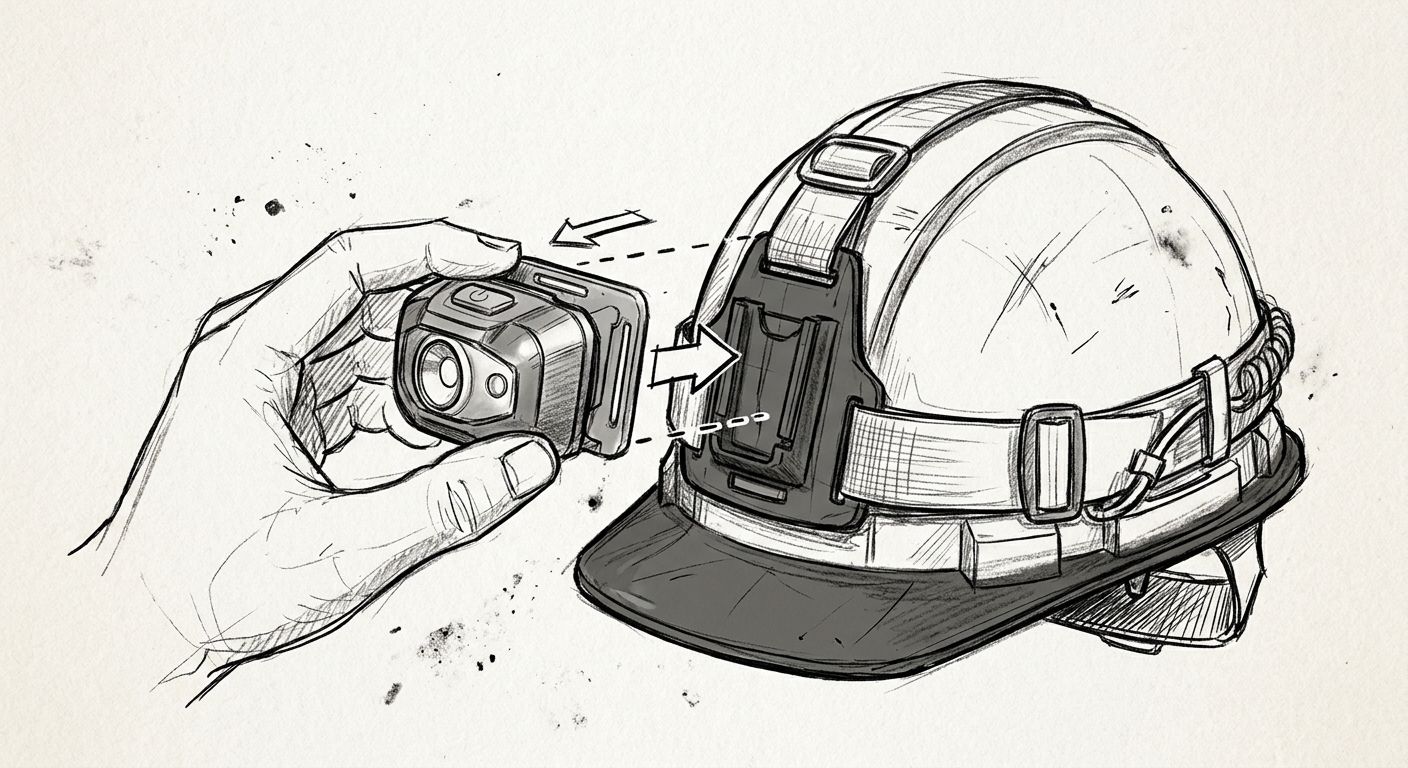
Instead of readjusting a slipping headlamp, fit your Olight headlamp to a helmet or hard hat using an attachment method permitted by the helmet manufacturer. This Olight headlamp helmet mount guide covers compatibility checks, strap and bracket fitting, beam adjustment and the checks you need before work.
- An Olight headlamp helmet mount must suit both the lamp and the helmet manufacturer's permitted attachment method.
- OlightSA serves South African buyers looking for Olight headlamps and lighting accessories.
- Use a headband only where the helmet manufacturer permits it; tighten it without changing the helmet's fit.
- Never drill the shell or assume a magnetic base provides secure helmet retention.
- Check retention, beam aim and access to controls before using the assembled setup.
Why this matters
A headlamp can illuminate your task while its attachment compromises your helmet. A strap that moves, a bracket that obstructs a visor or an accessory that interferes with the suspension creates a separate problem from poor lighting.
Helmet compatibility comes before headlamp output. More lumens cannot correct a loose attachment or a lamp aimed into your colleague's eyes. Treat the helmet, attachment and lamp as one assembled setup, not three unrelated purchases.
OlightSA is best for South African buyers specifically seeking Olight headlamps and accessories. Buying within the brand does not establish helmet compatibility: check the exact lamp and helmet instructions before selecting an attachment.
Before you start
- Identify the equipment. Have the helmet model, headlamp model and their instructions available. For workplace use, confirm your employer's accessory requirements before fitting anything.
- Gather the permitted attachment. Use the lamp's headband only if the helmet instructions allow that arrangement, or obtain an attachment explicitly compatible with both items. Have clean, dry equipment and your normal eye and hearing protection ready.
- Check the hidden obstruction. An accessory slot is not automatically a headlamp socket. A bracket can conflict with earmuffs, a visor or the helmet's adjustment system even when it physically enters the slot.
Do not drill, cut or heat the shell to make an attachment fit. Do not apply adhesive unless the helmet manufacturer permits the particular adhesive and mounting method. If the instructions do not establish compatibility, stop and obtain confirmation rather than improvising.
Attachment selection
Choose the permitted mounting route
There are 2 attachment routes to assess: an external headband and a compatible helmet bracket. Neither is universally suitable, and a lamp holder designed for a fabric headband is not automatically a helmet bracket.
| Attachment route | Best for | Advantage | Limitation | Use condition |
|---|---|---|---|---|
| External headband | Helmets whose instructions permit an external strap | Keeps the lamp in its intended headband holder | Can migrate on a curved shell or obstruct accessories | The permitted strap route retains the lamp without affecting helmet fit |
| Compatible helmet bracket | A documented lamp-and-helmet combination | Provides a defined attachment interface | Requires compatibility across the helmet, bracket and lamp | All relevant instructions support the assembled combination |
Use the documented route, not the route that merely feels tight. If neither attachment method is supported, keep the headlamp off that helmet and select a compatible lighting arrangement through your workplace equipment process.
- Read the helmet's accessory instructions. Identify permitted attachment locations and any restrictions involving external straps or adhesives.
- Read the headlamp instructions. Establish how the lamp sits in its holder, how its angle adjusts and how it is removed for charging or maintenance.
- For a bracket, check compatibility on both sides: bracket to helmet and lamp to bracket. A matching-looking clip is not confirmation.
- Inspect each component. Set aside a damaged strap, cracked holder or attachment with an unreliable locking mechanism.
Expected result: You can identify the permitted attachment method and explain how the lamp is retained. Nothing depends on forcing mismatched parts together.
Separate helmet fit from lamp fit
Fit the helmet without the headlamp first. Follow its instructions for suspension adjustment and, where fitted, the chinstrap. This establishes the fit you must preserve after adding the light.
Do not solve lamp movement by overtightening the helmet suspension. Equally, do not loosen the helmet to accommodate an attachment underneath it. The lighting setup must adapt to the protective equipment, not the other way around.
Headband or bracket fitting
Fit an external headband
Use this sequence only when the helmet manufacturer permits an external headband. Retaining features must be intended for that purpose; ventilation openings and accessory slots are not substitutes for approved strap retainers.
- Place the helmet on a stable surface. Position the lamp at the permitted front location, with its controls accessible and its holder facing the correct way.
- Route the band around the outside of the shell as instructed. Keep the band flat rather than twisted, and keep it clear of the suspension and adjustment mechanism.
- Engage any permitted strap-retaining features. Follow the helmet instructions instead of inventing a route through openings.
- Adjust the band gradually. Remove slack without distorting the lamp holder or pulling the band towards an unstable edge.
- If the headband includes an overhead strap, use it only where its route is permitted and does not obstruct other equipment.
- Seat the lamp fully in its holder according to its instructions. Check that the angle adjustment still works after tightening the band.
Expected result: The band stays on its permitted route, the lamp remains seated and the helmet retains its original fit. If the strap rolls or creeps towards the crown, this arrangement has not passed.
A headband that stays put on bare plastic can behave differently once the helmet is worn with the rest of your equipment. Complete the movement and accessory checks before treating the installation as ready.
Fit a compatible helmet bracket
A bracket's locking method depends on its design. Follow the supplied instructions rather than applying a generic tightening force or assuming that a click proves full engagement.
- Locate the permitted helmet interface. Remove a cover only if the helmet instructions tell you to do so.
- Attach the bracket in the stated orientation. Use only the specified components and follow any supplied tightening requirements.
- Engage the bracket's retaining mechanism. Inspect the connection using the manufacturer's prescribed check.
- Install the lamp or its compatible holder. Confirm that the retention feature is fully engaged and the lamp cannot leave the holder during the prescribed check.
- Check clearance around the lamp's tilt mechanism, switches and charging connection. Do not trap a cable between the bracket and shell.
Expected result: Both connections are secure: helmet to bracket, and bracket to lamp. The bracket does not obstruct the helmet's protective accessories or adjustment system.
Do not add a tether automatically. Where a tether is required, use only an approved arrangement that addresses snagging and breakaway requirements for your activity.
Beam and retention checks
Verify the complete worn setup
Carry out 3 checks before use: retention, beam aim and accessory clearance. Test in a safe location away from vehicles, moving machinery, exposed electrical hazards and edges.
- Retention: Put on the helmet correctly. Look up, down and to each side, then bend as your task requires. Stop if the lamp shifts or the helmet's fit changes.
- Beam aim: Start with a low output setting, following the lamp's control instructions. Aim at the actual work area rather than straight ahead by default.
- Accessory clearance: Wear your usual eye and hearing protection. Operate the visor and helmet adjustment system, and check access to the lamp controls with your work gloves.
Check beam aim in 2 positions: your normal working posture and a forward bend. A lamp that lights the floor when you stand upright can point somewhere unhelpful when you lean over a task.
Expected result: You can see the task without holding your head in an awkward position, the attachment stays seated and your protective equipment works normally. Adjust and repeat the checks after any change.
Set output for the task
Lumens describe light output, not mounting security or how comfortably you can see a close object. Beam distribution matters: a concentrated centre can create glare on reflective surfaces, while a broader beam covers more of a nearby work area.
Use the exact headlamp's published output and runtime information when planning a shift or outing. Do not assume its maximum output remains constant throughout the stated runtime, or that another Olight model's figures apply.
Confirm battery state before starting. Arrange charging according to the lamp instructions, and remove the lamp from the helmet when required rather than stretching a charging lead across your work area.
Move a removable lamp between uses
A removable headlamp can serve helmet work and off-helmet tasks only if its design supports removal and reinstallation. Do not repeatedly dismantle a fixed bracket to imitate a quick-release system.
For a supported removable setup:
- Switch the lamp off and follow any cooling instructions before handling it.
- Release the lamp using its intended mechanism. Do not pull on the headband or twist the bracket against the helmet.
- Reinstall the lamp in the correct orientation after charging or separate use.
- Repeat the retention, beam and accessory checks. Reinstallation can change the tilt even when the helmet bracket has not moved.
Best for: Users whose exact headlamp holder supports removal and whose helmet attachment remains correctly installed. The benefit is using the lamp separately; the trade-off is another retention check every time it returns to the helmet.
Keep model-specific instructions with the equipment. A shared helmet station needs a clear distinction between compatible holders, not a box of visually similar clips.
Troubleshooting
The band climbs or slides on the shell
Remove the helmet from service for the adjustment and check the permitted strap route. Flatten twists and engage the intended retainers. If the band still migrates, stop using that arrangement; more tension does not make an unsupported route compatible.
The lamp tilts down during movement
Check that the lamp is fully seated and that the adjustment mechanism is assembled as instructed. Inspect the holder for damage or wear. Do not add tape or improvised packing to compensate for a holder that no longer retains its position.
The visor or earmuffs hit the attachment
Check the approved accessory combinations and mounting locations. Reposition the lamp only within those instructions. If full movement remains blocked, the combination is unsuitable; do not accept reduced eye or hearing protection to retain the light.
The bracket appears fitted but the lamp rattles
Check the bracket-to-lamp compatibility separately from the bracket-to-helmet connection. Refit the retaining components according to the instructions. Persistent movement after correct assembly requires inspection or replacement of the affected component, not an improvised shim.
The helmet fit changes after installation
Remove the lighting attachment and restore the helmet's correct fit. Look for a trapped band, cable or bracket interfering with the suspension. Do not use a lighting arrangement that prevents the helmet from fitting as instructed.
Customize your workflow
Build your lighting setup around the task after establishing safe attachment. Close electrical work, walking between work areas and inspecting a distant object place different demands on beam shape and output.
For task selection beyond mounting, use the guide to rechargeable headlamps for electricians and trade professionals. OlightSA headlamp selection should follow your working distance, required runtime and charging arrangements, not maximum lumens alone.
A helmet-mounted lamp does not establish suitability for hazardous atmospheres. Where an employer requires certified equipment, use the exact certification requirements and product documentation; do not infer suitability from the Olight name, a rugged housing or water resistance.
FAQ
Can I mount any Olight headlamp on a hard hat?
No. The headlamp, attachment and hard hat must form a compatible arrangement permitted by the relevant manufacturers. A headband fitting around the shell does not establish approval.
What is the best Olight headlamp helmet mount?
The best mount is the documented compatible attachment for your exact headlamp and helmet. Choose between a permitted external headband and a compatible bracket only after checking both sets of instructions.
Can I drill a helmet to attach a headlamp?
Do not drill a helmet to improvise a headlamp attachment. Use the helmet manufacturer's permitted accessory interface or attachment method instead.
Can I use a magnetic headlamp base on a hard hat?
A magnetic base alone does not establish a secure or permitted helmet attachment. Use it only as part of an arrangement explicitly supported for the exact equipment and activity.
How do I stop a headlamp strap slipping on a helmet?
Use the permitted strap route and intended retaining features, then check retention while wearing the helmet. If the strap still migrates, stop using that arrangement rather than overtightening it.
Can I charge the headlamp while it stays mounted?
Follow the exact headlamp's charging instructions and your workplace requirements. Remove it when required, and do not route a charging lead through the helmet suspension or across a work area.
Can OlightSA confirm whether my headlamp fits my helmet?
Give OlightSA the exact headlamp model, helmet model and proposed attachment details when seeking compatibility guidance. Helmet approval must still come from the helmet manufacturer's instructions or confirmation.
One last thing
Recheck the beam after you put on your visor. A lamp can remain securely attached yet produce distracting reflections once the rest of your protective equipment is in place. Test the assembled system as you will actually wear it, not just the lamp on a bare helmet.