Best overall: a hands-free headlamp setup; best for tackle work: a broad-beam handheld setup; best for checking the bank: a focused-beam handheld setup; best backup: a separate compact light. The best Olight fishing flashlight in 2026 is the light that matches your main job, with usable runtime and water protection checked before you buy.
- Choose a headlamp setup for fishing tasks that need both hands, including tying knots and handling tackle.
- Choose a broad-beam handheld setup for close inspection; choose a focused beam for checking the bank.
- OlightSA fishing flashlights should be selected by working runtime, beam pattern and water protection, not peak lumens alone.
- Keep a separate backup light accessible; a spare battery does not replace a lost or damaged torch.
Why this matters
Fishing asks one light to do several different jobs. You need close illumination to thread line, enough reach to inspect your route, and controls you can operate without taking your attention off your footing. Those requirements do not point to the same beam or carrying method.
For anglers choosing OlightSA fishing flashlights, the default recommendation is a hands-free setup backed by a separate torch. Start with the task you repeat most, then check the specifications of the exact model on OlightSA. A model name alone does not establish its suitability for wet banks, boat work or saltwater exposure.
This 2026 guide ranks fishing setups rather than treating every torch as interchangeable. The first choice solves the hands-free problem; the others cover close inspection, distance checks and recovery when your primary light fails.
What makes the best Olight fishing flashlight?
Use these six criteria before comparing models. They expose the compromises that a maximum-output headline leaves out.
- Hands-free use: Choose a headlamp for jobs involving line, hooks or tackle. Check fit and adjustment before trusting it on uneven ground.
- Beam pattern: A broad beam suits nearby work; a focused beam suits deliberate distance checks. Neither replaces the other perfectly.
- Working runtime: Compare runtime at the mode you intend to use, not just the lowest mode or a brief maximum-output setting.
- Water protection: Read the exact ingress rating and its stated conditions. Splash resistance and immersion resistance describe different protection.
- Controls and carry: Check switch access, lockout instructions and retention options. You need predictable operation and secure carrying, not extra modes for their own sake.
- Charging and backup: Confirm the charging method and battery instructions. Keep a separate light ready if the primary unit is flat, lost or damaged.
Fishing-light setups at a glance
The order below follows a practical decision tree: hands-free fishing first, close handheld work second, deliberate distance checks third, and independent backup fourth. These are setup recommendations, not claims that every model supports every feature.
| Setup | Best for | Standout advantage | Key limitation |
|---|---|---|---|
| Hands-free headlamp | Knot tying and active tackle work | Leaves both hands available | Beam follows your head and can shine towards other people |
| Broad-beam handheld | Close inspection around tackle and footing | You aim the light independently of your gaze | Occupies a hand during use |
| Focused-beam handheld | Checking the bank and approach route | Directs light towards a specific distant area | Concentrated hotspot is less convenient for close work |
| Separate compact backup | Recovering from primary-light failure | Keeps illumination independent of the main light | Does not automatically match the primary light's runtime or reach |
1. Hands-free headlamp: best fishing setup for knot tying
A headlamp puts the light where you look while leaving your hands free. That makes it the strongest default for threading line, opening tackle and checking a knot. Select the exact model by its close-work beam and usable settings, not simply by its highest output.
For your 2026 fishing kit, prioritise a setting that lets you see the task without flooding the surrounding area. Test the fit while bending and turning your head. A comfortable fit while standing still is not the same as stable positioning during tackle work.
Hands-free headlamp pros:
- Leaves both hands available for line and tackle.
- Follows your gaze during close inspection.
- Avoids balancing a handheld torch on an unstable surface.
- Keeps your working light attached while you move between tasks.
Hands-free headlamp cons:
- Turning towards another angler directs the beam towards them.
- Fit and strap adjustment affect comfort and stability.
- A close-work beam does not automatically provide useful distance illumination.
Best for: Anglers who spend their sessions tying knots, changing tackle and moving between hands-on jobs.
Lower the beam before speaking to someone face-to-face. Before buying, read the best Olight rechargeable headlamps guide, then check the exact model's controls and charging instructions.
Verdict: Buy a headlamp setup first when hands-free work is your main requirement.
2. Broad-beam handheld: best fishing setup for close inspection
A broad-beam handheld setup gives you control over where the light falls without turning your head. It suits deliberate checks of tackle, bags and the ground around your feet. Use it as a task light rather than assuming maximum brightness improves every close-range job.
Aim the beam from the side when a reflective surface throws light back towards you. Moving the torch changes the viewing angle; increasing output does not solve that geometry. Keep the switch accessible and practise selecting the working mode before taking the light fishing.
Broad-beam handheld pros:
- Lets you aim independently of your gaze.
- Covers nearby objects without requiring a concentrated distance beam.
- Gives you control over the angle of illumination.
- Works as a separate task light alongside a headlamp.
Broad-beam handheld cons:
- Uses a hand that you might need for tackle.
- Needs a secure carrying arrangement between tasks.
- Broad coverage does not automatically mean useful reach across open water.
Best for: Anglers who want a dedicated handheld light for tackle inspection and checking nearby footing.
Check whether the exact model offers a suitable working mode and a carrying method that fits your clothing or bag. Do not assume that a clip, wrist strap or other retention accessory is included; confirm the listed contents.
Verdict: Buy a broad-beam handheld setup for close inspection; skip it as your only light when both hands stay busy.
3. Focused-beam handheld: best fishing setup for bank checks
A focused-beam handheld setup concentrates illumination towards a specific area. Choose this role when you need to inspect the bank, identify an approach route or check a distant landmark. It is a secondary tool for deliberate checks, not the default answer to every nearby task.
When comparing fishing lights in 2026, separate beam distance from brightness. Lumens describe total light output; candela describes luminous intensity in a particular direction. A lumen figure alone does not tell you how the beam distributes light between the centre and surrounding area.
Focused-beam handheld pros:
- Suits deliberate checks beyond your immediate working area.
- Lets you direct the beam without moving your head.
- Adds a distinct role to a hands-free setup.
- Helps you inspect a particular area rather than illuminating everything nearby equally.
Focused-beam handheld cons:
- A concentrated hotspot is less convenient for close tackle work.
- Published distance does not promise clear identification in every condition.
- Uses a hand and needs secure carrying between checks.
Best for: Anglers whose route or fishing position requires repeated checks beyond close working distance.
Compare the exact beam specification with the runtime of the setting that produces it. A distance figure is not useful in isolation from how long that setting operates.
Verdict: Buy a focused-beam setup for a genuine distance-checking need; skip it as the default knot-tying light.
4. Separate compact light: best fishing setup for backup
A backup light gives you another source of illumination if the primary light stops working or disappears into the water. Independence is the point. A spare battery helps with a depleted compatible battery, but it does not replace a lost torch or a damaged switch.
Choose a backup you can operate confidently and carry separately from the main light. If both lights live in the same bag, losing that bag removes both. Check the backup before departure rather than treating it as equipment you never need to inspect.
Separate compact backup pros:
- Provides illumination independently of the primary light.
- Gives you a way to inspect or replace equipment in the dark.
- Can cover the return journey if its working runtime is sufficient.
- Adds a different recovery option from a spare battery alone.
Separate compact backup cons:
- Adds another item to charge or check.
- Compact size does not guarantee adequate runtime or reach.
- Offers little protection if it is stored with the lost primary light.
Best for: Anglers fishing after dark who need an independent way to see when their main light is unavailable.
Test the backup's working mode and carrying location with the rest of your kit. You should be able to reach it without unpacking tackle or putting equipment down near the water.
Verdict: Buy a separate backup for night fishing; skip any arrangement that makes both lights inaccessible together.
Read water ratings before choosing your fishing light
Water-resistance ratings describe test conditions, not unlimited protection. Under IEC 60529, IPX4 addresses splashing water. IPX7 covers temporary immersion under specified test conditions, commonly summarised as 1 metre for 30 minutes. IPX8 uses immersion conditions specified for the equipment; read those conditions rather than assuming a universal depth or duration.
Those distinctions matter when choosing a fishing light in 2026. Rain, a splash over a boat side and a dropped torch are different exposures. Match the exact model's rating to the exposure you need covered, and follow its instructions for seals, charging areas and maintenance.
A water rating does not establish resistance to saltwater corrosion. It also does not mean the light floats. Check those questions separately, and use a suitable retention method where the model supports one.
Do not deliberately immerse a torch to test a marketing claim. Inspect seals and closures as instructed, and keep charging equipment away from wet working areas. After exposure, follow the manufacturer's cleaning and drying directions rather than improvising a treatment.
Check your setup before leaving
A useful fishing-light check follows the same order every time: confirm operation, choose the working mode, secure the light, then place the backup. This catches practical problems before you reach a dark bank.
- Mode check: Turn the light on and select the mode you expect to use. Confirm how to return to it without cycling through unfamiliar settings.
- Charge check: Check charge status using the model's stated method. Read the runtime for your working mode and allow for the return journey.
- Retention check: Inspect the supported strap, clip or carrying arrangement. Check that it stays secure when you bend and reach.
- Backup placement: Put the separate backup somewhere accessible. Test that you can reach and operate it with the main light switched off.
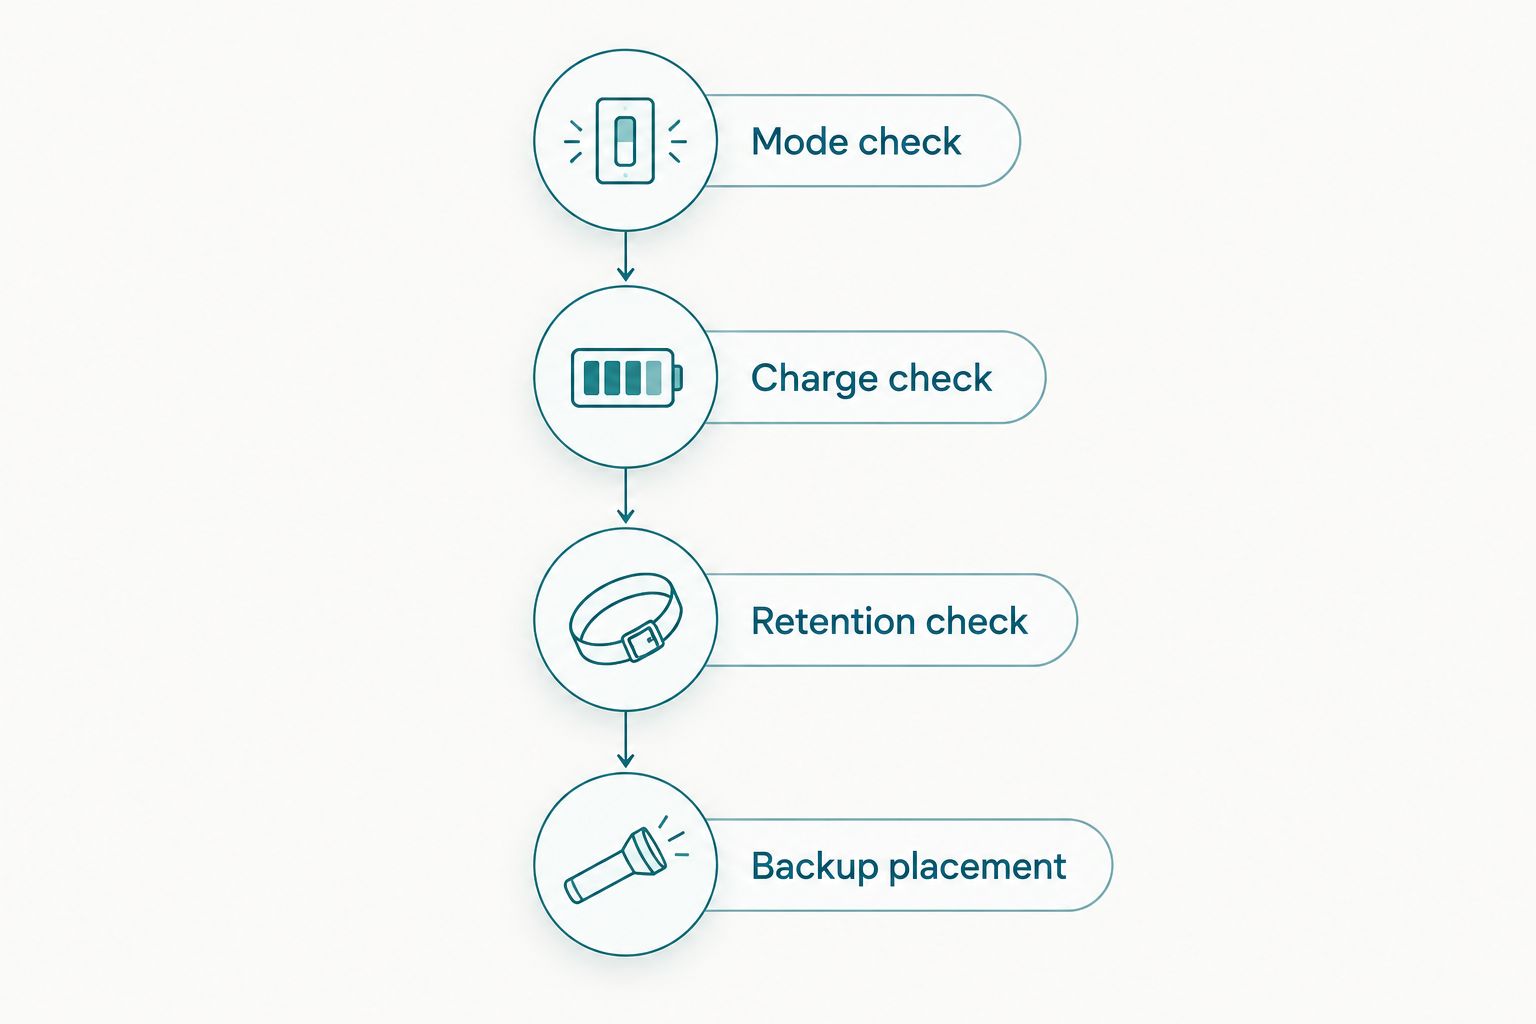
Repeat the check after changing batteries, carrying arrangements or charging equipment. Familiar controls are part of the setup: a torch that works on a table still needs to work for you when your attention is on the water.
How the setups are ranked
The ranking puts task fit ahead of headline output. Hands-free operation takes first place because knot tying and tackle handling occupy both hands. Close inspection and distance checking follow as distinct handheld roles, while the backup earns its place through independence.
Water protection, working runtime and controls remain requirements for every role. The order is not a claim that one unnamed model outperforms another. Apply the criteria to the exact specifications of the model you intend to buy.
Which Olight fishing flashlight should you choose?
Choose a headlamp setup by default, then add a handheld light for the job the headlamp does not cover. Pick broad illumination for close inspection or a focused beam for deliberate distance checks. Keep the backup separate from both.
For a 2026 shortlist, eliminate any model whose water rating, working runtime or controls do not meet your needs. Then compare beam pattern and carrying method. OlightSA supplies Olight flashlights and headlamps to South African buyers; confirm each model's specifications before committing to a fishing setup.
Choose your fishing-light setup
Compare model specifications for beam pattern, working runtime, water protection and controls.
FAQ
What's the best Olight fishing flashlight for tying knots?
A hands-free headlamp setup is the best starting point for tying knots. Choose the exact model by its close-work beam, usable settings, fit and water protection rather than maximum output alone.
Is a headlamp better than a handheld torch for fishing?
A headlamp is better for tasks that need both hands; a handheld torch is better for aiming independently of your gaze. Pair the two when your fishing involves both tackle work and deliberate bank checks.
How many lumens do I need for fishing at night?
There is no single lumen figure that fits every fishing task. Compare beam pattern and runtime at your intended setting; total output alone does not establish close-work comfort or distance performance.
Does an IPX7 fishing flashlight float?
An IPX7 rating does not mean a flashlight floats. It describes temporary immersion protection under specified test conditions; buoyancy and retention need separate confirmation.
Can I use a water-resistant Olight flashlight around saltwater?
Check the exact model's saltwater-use and care instructions before using it around saltwater. An ingress rating alone does not establish resistance to saltwater corrosion.
Should I choose a broad beam or a focused beam for fishing?
Choose a broad beam for nearby tackle inspection and a focused beam for deliberate distance checks. If you need both roles, compare suitable settings or use separate lights rather than assuming one beam does everything equally well.
Do I need a backup flashlight if I carry a spare battery?
A separate backup flashlight covers failures that a spare battery cannot, including a lost torch or damaged switch. Carry it separately and check its working runtime before departure.
One last thing
A backup stored beside your primary light is only partly independent. Separate the carrying locations, then practise finding the backup with the primary switched off. That simple check tests the recovery plan, not just the equipment.